Settings MS2201: Difference between revisions
(→Edit Remote Buttons: - link to macro code ref) |
|||
| (23 intermediate revisions by 2 users not shown) | |||
| Line 1: | Line 1: | ||
<div style="font-size:84%">'''[[Chime_Master_Help|Help]] > [[Operating manuals]] > [[Using_Management_Suite|Management Suite]]'''</div> | |||
The settings menu allow you to set preferences and features to match your congregation and time zone. | The settings menu allow you to set preferences and features to match your congregation and time zone. | ||
This page describes the options for the Millennium and Platinum carillons. The [[Settings MS SixSS|settings screen for Six-SS carillons]] is described on a separate page. | |||
== Time Strike Melody == | == Time Strike Melody == | ||
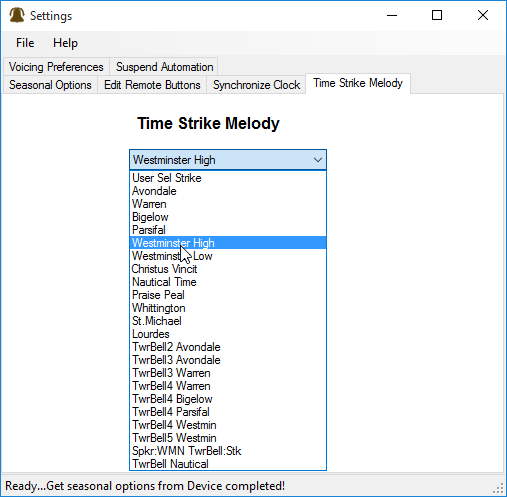
Use the pull down menu to select the melody you would like to use for quarterly clock chiming. If you select User Sel Strike, you can enter selection numbers into the four fields for each quarter. Any valid selection number will work. If you have the recording librarian, you can compose and record your own clock chiming melody on the keyboard or import MIDI files for each quarter. | |||
[[File:Suite-5-10-set-time-chime.png|none|frame|Time strike chimes available on Platinum carillon with tower bell outputs]] | |||
== Voicing Preferences == | == Voicing Preferences == | ||
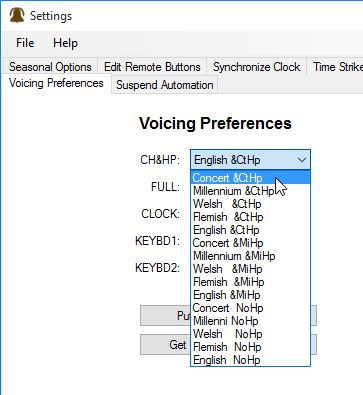
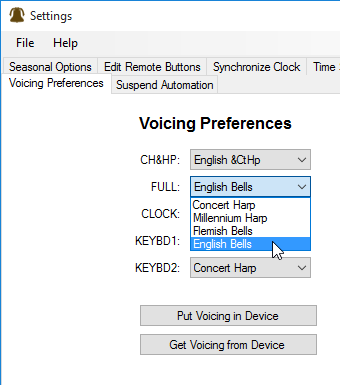
Set the musical voice for each arrangement style, clock striking and keyboard modes. The number of available voices will vary depending upon your carillon model. | Set the musical voice for each arrangement style, clock striking and keyboard modes. | ||
[[File:Suite-5-10-set-voice-ch.png|none|frame|Platinum Carillon arrangement voicing]] | |||
The number of available voices will vary depending upon your carillon model. | |||
[[File:Suite-5-10-set-voice-car.png|none|frame|Platinum Chime arrangement voicing]] | |||
In the keyboard modes, the voice button on the front panel (or remote control app) selects the voice for the primary keyboard (Keyboard 1). It can either rotate through all of the voices in the system, or only between the two voices selected for Full Carillon or Chime arrangements. | In the keyboard modes, the voice button on the front panel (or remote control app) selects the voice for the primary keyboard (Keyboard 1). It can either rotate through all of the voices in the system, or only between the two voices selected for Full Carillon or Chime arrangements. | ||
| Line 15: | Line 27: | ||
The MIDI channels and keyboard transposition for each keyboard is automatically set from the carillon panel using the System Setup Menu - Keyboard Size/MIDI screen (see the carillon Operating Manual). | The MIDI channels and keyboard transposition for each keyboard is automatically set from the carillon panel using the System Setup Menu - Keyboard Size/MIDI screen (see the carillon Operating Manual). | ||
== Edit Remote Buttons == | |||
When the system is in Standby mode (not playing, displaying the current time), buttons 1 through 8 can be programmed to manually trigger selections to play. Buttons 1 through 4 are available on the optional mini remote control. All eight buttons are available to the mobile app Church Bell Remote. In addition, all eight button programs correspond to [[Macro_code_reference|macro codes]] 7901 through 7908. You can use these macro selection codes to schedule automatic play of the selections programmed in the buttons, including Annual Events and Non-Recurring Events. | |||
[[File:Suite-5-10-set-remote-toll.png|none|frame|Time strike chimes available on Platinum carillon with tower bell outputs]] | |||
Pull down the button code you wish to program F1 through F8 in the left field. | Pull down the button code you wish to program F1 through F8 in the left field. | ||
| Line 34: | Line 45: | ||
To the right of the button's short name are drop downs that determine how the Stop and Play remote button will work with the remote function. | To the right of the button's short name are drop downs that determine how the Stop and Play remote button will work with the remote function. | ||
*Wait will cue the selection and be ready to instantly start it with the Play button. The selection will remain ready to play for up to an hour. | * '''Wait''' will cue the selection and be ready to instantly start it with the Play button. The selection will remain ready to play for up to an hour. | ||
*Now! instead of Wait, will execute the function when it is ready without waiting for the Play button. | * '''Now!''' instead of Wait, will execute the function when it is ready without waiting for the Play button. | ||
*Nonstop will play multiple selections or repeats of the same selection without pausing for you to press the Play button to resume. | * '''Nonstop''' will play multiple selections or repeats of the same selection without pausing for you to press the Play button to resume. | ||
*Stop will pause after every selection to wait for the Play button to resume the program. | * '''Stop''' will pause after every selection to wait for the Play button to resume the program. | ||
A single selection can be repeated up to 199 times. Set the number of repeats to 1 if you wish to program more than one selection. A single toll can be repeated to represent the age of the deceased for a funeral toll. | A single selection can be repeated up to 199 times. Set the number of repeats to 1 if you wish to program more than one selection. A single toll can be repeated to represent the age of the deceased for a funeral toll. | ||
| Line 49: | Line 60: | ||
== Synchronize Clock == | == Synchronize Clock == | ||
The internal carillon clock can be synchronized to internet timeservers using the time zone you set in Windows on the host computer. If the checkbox for Automatically Synchronize Date and Time is selected, the time will set every day if the Management Suite is running and left at the main menu. Manual synchronizing can be done by clicking the button on this settings tab. If your network does not access the Internet and you have your own time server, the Premium Management Suite’s Administrator options allow you to specify | The internal carillon clock can be synchronized to internet timeservers using the time zone (and Daylight Time preferences - these override the preferences set in the Seasonal Options) you set in Windows on the host computer. If the checkbox for Automatically Synchronize Date and Time is selected, the time will set every day if the Management Suite is running and left at the main menu. Manual synchronizing can be done by clicking the button on this settings tab. If your network does not access the Internet and you have your own time server, the Premium Management Suite’s Administrator options allow you to specify a custom address for any available network time server. | ||
== Suspend Automation Timeout == | == Suspend Automation Timeout == | ||
| Line 61: | Line 72: | ||
== Seasonal Options == | == Seasonal Options == | ||
Use this | Use this tab to select the [[SmartAlmanac|SmartAlmanac™]] seasons you wish to use to automatically substitute seasonal music. In addition, you can select which music arrangements you would prefer the almanac to use when randomly selecting seasonal music on a Millennium or Platinum carillon. | ||
Unless otherwise indicated below, if you say No to a particular season then the system will continue to play non-seasonal music. Except for Patriotic, the settings only affect the sacred seasonal random groupings. | Unless otherwise indicated below, if you say No to a particular season then the system will continue to play non-seasonal music. Except for Patriotic, the settings only affect the sacred seasonal random groupings. | ||
| Line 69: | Line 80: | ||
=== Automatic Daylight Saving Time === | === Automatic Daylight Saving Time === | ||
Set this option to Yes if the system is to automatically set the clock forward and back for Daylight Saving Time. | Set this option to Yes if the system is to automatically set the clock forward and back for Daylight Saving Time. If you use Management Suite to synchronize your clock, make sure that the PC time preferences are correctly set for both your time zone and Daylight time options. | ||
=== Smart Almanac Settings === | === Smart Almanac Settings === | ||
[[File:Suite-5-10-set-seasons.png|none|frame|SmartAlmanac Seasonal Options]] | |||
==== Use US Patriotic ==== | ==== Use US Patriotic ==== | ||
| Line 80: | Line 93: | ||
If this option is set to Yes then Lenten music for Grp1 and Grp3 selections will play from Ash Wednesday until Good Friday. | If this option is set to Yes then Lenten music for Grp1 and Grp3 selections will play from Ash Wednesday until Good Friday. | ||
==== Off on Good Friday | ==== Off on Good Friday (and Saturday) ==== | ||
If this option is set to Yes then there will be no sacred seasonal music to play. If you have Grp1 or Grp3 selections programmed, the system will remain silent. If the option is set to No, the system will continue to play Lenten music on Good Friday and Holy Saturday. | If this option is set to Yes then there will be no sacred seasonal music to play. If you have Grp1 or Grp3 selections programmed, the system will remain silent. If the option is set to No, the system will continue to play Lenten music on Good Friday and Holy Saturday. | ||
Any specific selections programmed will continue to play. To silence the bells, you may temporarily turn off the tower amplifier, or [[Scheduler_weekly_MS#Managing_Multiple_Schedules|temporarily replace the weekly schedule]]. | |||
==== Play Easter ==== | ==== Play Easter ==== | ||
| Line 125: | Line 140: | ||
=== Speaker zoning === | === Speaker zoning === | ||
The right side of the Seasonal Options tab also has settings for speaker zoning. There are also selection macros that can be 'played' to make changes to this setting, so | The right side of the Seasonal Options tab also has settings for speaker zoning. There are also selection macros that can be 'played' to make changes to this setting, so review your schedules if they seem to change on you. | ||
Both automatic play (any music or bell ringing activated by the automatic schedule) and manual play (music or bell ringing activated by the remote control or Play Selections menu) can be set so that the speakers will operate inside only, outside only or both (inside and outside). | Both automatic play (any music or bell ringing activated by the automatic schedule) and manual play (music or bell ringing activated by the remote control or Play Selections menu) can be set so that the speakers will operate '''inside''' only, '''outside''' only or '''both''' (inside and outside). | ||
Generally you would set the automatic mode to play either both or outside only. The factory defaults are to play both inside and outside for automatic and manual selections. | Generally you would set the automatic mode to play either both or outside only. The factory defaults are to play both inside and outside for automatic and manual selections. | ||
| Line 133: | Line 148: | ||
Let’s say for an example, that you only wish the keyboard performances to be heard inside. That is, all non-keyboard bell-ringing needs to play outside only. To accomplish this, set automatic to outside, and manual to outside. Because these options do not affect the keyboard performance modes, only the keyboard will be heard through the inside speakers. | Let’s say for an example, that you only wish the keyboard performances to be heard inside. That is, all non-keyboard bell-ringing needs to play outside only. To accomplish this, set automatic to outside, and manual to outside. Because these options do not affect the keyboard performance modes, only the keyboard will be heard through the inside speakers. | ||
When the system is playing, the green front panel lights will indicate which speakers are active. | When the system is playing, the green front panel lights will indicate which speakers are active. | ||
<div style="font-size:84%">'''[[Chime_Master_Help|Help]] > [[Operating manuals]] > [[Using_Management_Suite|Management Suite]]'''</div> | |||
[[Category:Management Suite]] | [[Category:Management Suite]] | ||
Latest revision as of 15:54, 18 January 2018
The settings menu allow you to set preferences and features to match your congregation and time zone.
This page describes the options for the Millennium and Platinum carillons. The settings screen for Six-SS carillons is described on a separate page.
Time Strike Melody
Use the pull down menu to select the melody you would like to use for quarterly clock chiming. If you select User Sel Strike, you can enter selection numbers into the four fields for each quarter. Any valid selection number will work. If you have the recording librarian, you can compose and record your own clock chiming melody on the keyboard or import MIDI files for each quarter.
Voicing Preferences
Set the musical voice for each arrangement style, clock striking and keyboard modes.
The number of available voices will vary depending upon your carillon model.
In the keyboard modes, the voice button on the front panel (or remote control app) selects the voice for the primary keyboard (Keyboard 1). It can either rotate through all of the voices in the system, or only between the two voices selected for Full Carillon or Chime arrangements.
The secondary keyboard (Keyboard 2) is always uses the voice selected here.
The MIDI channels and keyboard transposition for each keyboard is automatically set from the carillon panel using the System Setup Menu - Keyboard Size/MIDI screen (see the carillon Operating Manual).
Edit Remote Buttons
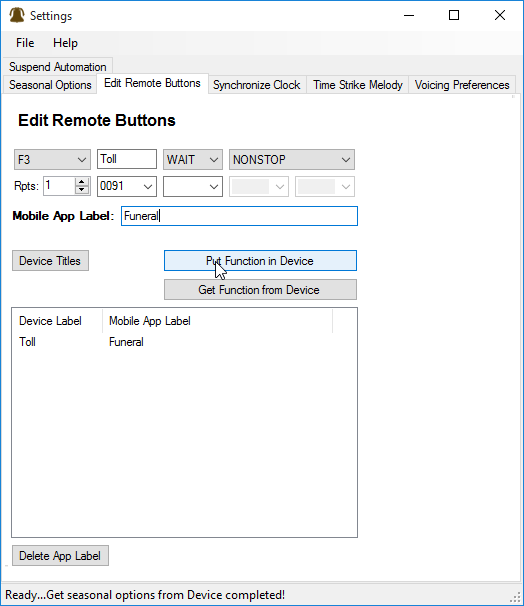
When the system is in Standby mode (not playing, displaying the current time), buttons 1 through 8 can be programmed to manually trigger selections to play. Buttons 1 through 4 are available on the optional mini remote control. All eight buttons are available to the mobile app Church Bell Remote. In addition, all eight button programs correspond to macro codes 7901 through 7908. You can use these macro selection codes to schedule automatic play of the selections programmed in the buttons, including Annual Events and Non-Recurring Events.
Pull down the button code you wish to program F1 through F8 in the left field.
Button name label
Buttons 1 through 4’s four-character (short) name are displayed on the lower line of the carillon’s display. These can be edited in the field to the right of the button pull-down selector. The Church Bell Remote mobile app uses the first two characters of the button’s short name to determine which icon to display for the function.
The Mobile App Label allows you to give the function a more meaningful long name that will display beneath the button in the mobile app.
Button program
To the right of the button's short name are drop downs that determine how the Stop and Play remote button will work with the remote function.
- Wait will cue the selection and be ready to instantly start it with the Play button. The selection will remain ready to play for up to an hour.
- Now! instead of Wait, will execute the function when it is ready without waiting for the Play button.
- Nonstop will play multiple selections or repeats of the same selection without pausing for you to press the Play button to resume.
- Stop will pause after every selection to wait for the Play button to resume the program.
A single selection can be repeated up to 199 times. Set the number of repeats to 1 if you wish to program more than one selection. A single toll can be repeated to represent the age of the deceased for a funeral toll.
Fill the selection fields with a four digit selection number or pull down to select a random music selection from one of the SmartAlmanac groups.
Save button program
After you have edited the changes, click Put Function into Device to transfer the settings to the carillon.
Synchronize Clock
The internal carillon clock can be synchronized to internet timeservers using the time zone (and Daylight Time preferences - these override the preferences set in the Seasonal Options) you set in Windows on the host computer. If the checkbox for Automatically Synchronize Date and Time is selected, the time will set every day if the Management Suite is running and left at the main menu. Manual synchronizing can be done by clicking the button on this settings tab. If your network does not access the Internet and you have your own time server, the Premium Management Suite’s Administrator options allow you to specify a custom address for any available network time server.
Suspend Automation Timeout
You can temporarily suspend the automatic schedules from ringing the bells. Schedule suspension is activated either by holding the front panel '0' button for two seconds, or pressing the Automation Off button on the Church Bell Remote mobile app. In case you forget to toggle the schedules back on, they will resume after this timeout expires.
You can set the timeout to resume automatic operation in one to twenty hours.
This timeout setting does not affect the fixed one hour timeout for manual function cueing.
Seasonal Options
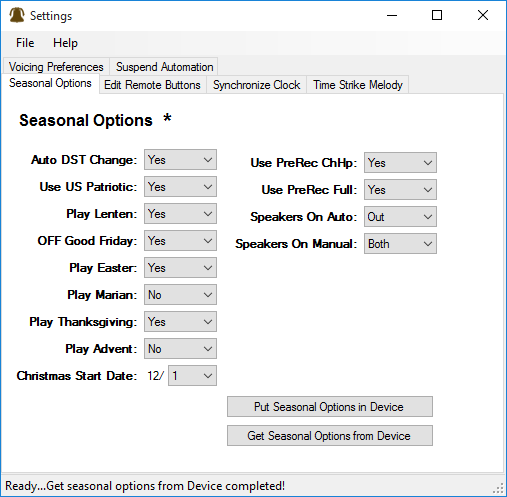
Use this tab to select the SmartAlmanac™ seasons you wish to use to automatically substitute seasonal music. In addition, you can select which music arrangements you would prefer the almanac to use when randomly selecting seasonal music on a Millennium or Platinum carillon.
Unless otherwise indicated below, if you say No to a particular season then the system will continue to play non-seasonal music. Except for Patriotic, the settings only affect the sacred seasonal random groupings.
Make the settings described below then click the Put Seasonal Options in Device button to update the carillon.
Automatic Daylight Saving Time
Set this option to Yes if the system is to automatically set the clock forward and back for Daylight Saving Time. If you use Management Suite to synchronize your clock, make sure that the PC time preferences are correctly set for both your time zone and Daylight time options.
Smart Almanac Settings
Use US Patriotic
If this option is set to Yes then the system will play patriotic music on Independence Day and Memorial Day (all seasonal groups).
Play Lenten
If this option is set to Yes then Lenten music for Grp1 and Grp3 selections will play from Ash Wednesday until Good Friday.
Off on Good Friday (and Saturday)
If this option is set to Yes then there will be no sacred seasonal music to play. If you have Grp1 or Grp3 selections programmed, the system will remain silent. If the option is set to No, the system will continue to play Lenten music on Good Friday and Holy Saturday.
Any specific selections programmed will continue to play. To silence the bells, you may temporarily turn off the tower amplifier, or temporarily replace the weekly schedule.
Play Easter
If this option is set to Yes and the Marian season is also set to Yes then Easter music will play from Easter Sunday until the end of April. If Marian is set to No then Easter music only plays for one week.
Play Marian
If this option is set to Yes then:
- Marian hymns will play August 15 and 22, December 8, and the entire month of May.
- Catholic hymns will be selected for sacred music.
If this option is set to No then:
- Non-seasonal music will play during the Marian seasons.
- Protestant hymns will be selected for sacred music.
Play Thanksgiving
If this option is set to Yes then Thanksgiving music will play on the Sunday preceding Thanksgiving Day and again on Thanksgiving Day.
Play Advent
If this option is set to Yes then Advent hymns will play from the First Sunday in Advent until the Christmas start date set below. In addition, the Advent setting determines when the Christmas Season ends.
Yes – Christmas ends on January 5 (before Epiphany) No – Christmas ends on December 26.
Christmas Start Date
Christmas music cannot be disabled. Instead, the date Christmas music begins to play can be set from December 1 to December 24.
Arrangements enabled for SmartAlmanac
These additional settings are on the Seasonal Options tab. On Millennium and Platinum models you can choose the arrangements that play for random music groups 1 through 8. Group 9 plays the each hymn on the arrangements that you set. If both of the following types of arrangements are disabled, you should have a good library of user selections recorded.
Use Pre-recorded Chime and Harp Arrangements
If this option is set to Yes, the factory-supplied music using two part Chime and Harp music is enabled. If these are the only arrangements available and you set the option to No all factory supplied random music will be disabled. Disabling the Harp accompaniment can be selected in the Voicing Options tab if available on your carillon (Millennium Gold and Platinum Editions).
Use Pre-recorded Full Carillon Arrangements
If this option is set to Yes, the factory supplied music using the full range carillon music is enabled. If these are the only arrangements available and you set the option to No all factory supplied random music will be disabled.
Speaker zoning
The right side of the Seasonal Options tab also has settings for speaker zoning. There are also selection macros that can be 'played' to make changes to this setting, so review your schedules if they seem to change on you.
Both automatic play (any music or bell ringing activated by the automatic schedule) and manual play (music or bell ringing activated by the remote control or Play Selections menu) can be set so that the speakers will operate inside only, outside only or both (inside and outside).
Generally you would set the automatic mode to play either both or outside only. The factory defaults are to play both inside and outside for automatic and manual selections.
Let’s say for an example, that you only wish the keyboard performances to be heard inside. That is, all non-keyboard bell-ringing needs to play outside only. To accomplish this, set automatic to outside, and manual to outside. Because these options do not affect the keyboard performance modes, only the keyboard will be heard through the inside speakers. When the system is playing, the green front panel lights will indicate which speakers are active.
